The school thing combined with the work thing is grueling. Too much to do with a full time job. Something had to give, so it was with great sorrow that I gave up my International Cooking class. I really liked it and felt I learned a lot, but it was scheduled on Friday and it kicked my butt. I worked from home for 1 1/2 hours, went to school for 5 hours, then drove to the office and worked another 5-6 hours. A very long day to say the least!
When I was going to that class, I kept forgetting my camera. Plus, although I'm very capable of cooking things at home, for some reason I had a bad mojo in that class, and things didn't turn out so well (therefore, I was pretty happy not to have the camera!).
That all said, I tried some interesting food that I really enjoyed, and I plan on making some of it on my own. First up, from our Latin America class - Chiles Rellenos. They have a special spot in my heart as my dad would make them when I was a kid. They aren't very complicated, but they are a little labor intensive.
The first step is to roast the chiles.

After roasting them, they need to sweat for a bit, and I took that time to prepare the rest of the ingredients.

In class we used gloves to remove the skin, seeds and veins of the chile, and stuff them with cheese. At home I had no problem with the oils from the chiles. I did have trouble getting the little buggers stuffed and back into their original shape. Again, it was easier at home than in class -- not sure if that's due to how the chiles were roasted, or the old "practice makes perfect" idea.
After reconstructing the chiles it was time to whip up the batter.
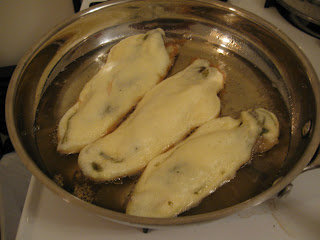
This worked out much better at home. It looked so pretty I didn't want to dip the chiles in it! But everybody ended up in the pool and in the frying pan. Try to keep track of where the slit is on each pepper and make sure that it is facing up when you put the chiles in the pan. Otherwise your cheese might melt and ooze out, which is neither pretty or tasty (well, fried cheese is tasty, but for this you'd rather have it in the chile -- or would you?)

After a quick fry and a quick turn, out they come to drain on a paper towel. You can eat them with salsa, but I enjoyed them just on their own.

Overall I was pleased with the results. They still had some chile heat, but not too much (I don't do well with spicy food). They probably could use a little bit more of a drain (perhaps a second set of paper towels to pick up some of the grease), but otherwise, they were very yummy. And happily I found all of the toothpicks! (be sure to count them as you put them in so you know how many you need to take out!).
12 medium Anaheim or Poblano chiles (about 2 pounds), roasted and peeled (see notes) (I used Anaheim chiles which are easy to find in your grocery store produce section)
1 1/4 lbs. grated Monterey Jack cheese (5 cups)
3 eggs, separated
1/8 tsp salt
vegetable oil, for frying
2/3 cup all-purpose flour
2 cups prepared salsa
Slit each Chile open lengthwise along 1 side and gently remove seeds and vein. Spread about 1/4 cup cheese in center of each pepper and press closed. Secure with toothpicks if necessary (remember to count them!). Set aside.
Beat egg whites in large non-aluminum bowl until stiff. Beat in salt, then egg yolks, 1 at a time.
Pour 1/2 inch of oil into heavy skillet and heat until almost smoking.
Sprinkle flour on both sides of as many chiles as will fit into your skillet in a single, uncrowded layer, then dip each pepper in egg mixture (you definitely don't want to dip them all at once). Place in oil and fry until golden on bottom, turn, and fry until golden on other side, about 1 minute. Remove chiles to paper towels to drain. Continue until all peppers are fried. Keep in a warm oven until all chiles are fried.
Arrange chiles on platter or individual plates and top with salsa. Serve right away.
Note: Wear gloves when handling fresh chiles; the oils can cause a burning sensation on your skin.
Note: To roast chiles, place in a preheated 450 degree oven on cookie sheet, turning after 10 minutes, and continue roasting until skins blister and blacken in spots. Or, place on broiler pan and broil about 5-6 inches from the heat source, turning often, until skin is charred on all sides. Or, hold over gas burner, turning until all sides are charred. Place in a bag or covered bowl for about 10 minutes. Skin should peel right off.


No comments:
Post a Comment