Tuesday, December 23, 2008

TWD: Move along.....nothing to see here today.......


I'm sitting out this week's recipe. For one thing, I'm not sure I'm a big butterscotch pudding fan. However, I've been surprised by how much I've liked a recipe before, so that's not the real reason for the "bye."

This may come as a surprise to some of you, but Christmas is just two days away! I know -- how did that happen?!? Since I work in a business that is busy this time of year I've spent a lot more time at work than home lately. Plus I'm not 100% done with my Christmas shopping, so tonight I'll be fighting my way into a few places to finish that up. I'm really looking forward to a few days off post-holiday. I mean REALLY!

After Dec. 25th I'll post about my contribution to the family's holiday dinner, along with my new favorite dish to make. And I'm excited about next week's TWD recipe -- I've never made a cheesecake before, so this should be a true adventure.

Here's wishing you all the very best this holiday season, whichever holiday you may celebrate!!


PS -- is it just me, or am I the only one who has eaten waaaaay too many sugary sweets this week or two? I've been semi-joking at work that if I keep at the rate I'm going, they will have to remove one of the plate glass windows to hoist me out of the building by year's end. I'm a little worried.......seriously!

Tuesday, December 16, 2008

TWD: Buttery Jam Cookies


Well, the Tuesdays with Dorie Cookiepolooza has come to an end. This week's selection comes from Heather over at Randomosity and the Girl. She picked this recipe because it's the time of year where there is lots of baking, and these are quick and easy. For me, this week's selection was a matter of survival! I am not kidding! (exaggerating, perhaps, but not kidding). Heather finds herself without the internet, I find myself without heat. I can't complain too much, what with half the country in the deep freeze. But a chilly house is a chilly house, so I needed to bake the cookies to stay warm. (Worry not, I don't have slum lords and I did pay the bill. Just a little glitch that will be fixed when the gas man comes out tomorrow. Perhaps I'll leave him some of these cookies like he's Santa!).

Some of the TWDers were won over by these cookies, others were not. Many found their cookies came out of the oven exactly the shape they went in. I really appreciate all the sharing that goes on at the site -- it has saved me more than once. Based on the shared experiences this time, I was extra careful not to over mix the dough so my cookies spread just a bit. I also made sure the cookies didn't have any burnt bottoms. And because I'm just a generous kind of gal, I taste tested each batch as it came out of the oven. I like to think of it as "quality control."

Because I did make the cookies small (I took the "rounded teaspoonful" directions literally) I got the 45 cookies as promised in the recipe (and no stomach ache after all the tasting). As for their taste, they grew on me. When reading the recipe it was pretty clear that there wasn't a lot of flavor outside of a small amount of ginger, the jam (I used apricot) and the vanilla. As Dorie said, it's a "side of the saucer" cookie, not the stand alone kind. I'll be curious what they taste like tomorrow, as a few bakers found they liked them better the next day. They'll go great with the morning tea I bet. These are the first cookies that were successful enough to go into the office for the co-workers. We'll see what they think of them (if a success they may see them again as their holiday gift!).

Tuesday, December 9, 2008

TWD: Grandma's All Occassion Sugar Cookies


This week's post will be like this week's recipe - short and sweet! Ulrike over at Kuchenlatein picked these quick and versatile cookies. A great choice for the holiday season!


I like versatility, and this recipe says you can either roll the cookies out and use cutters for the shapes, or you can shape the dough into a "chubby sausage" and slice-and-bake them. When I divided my dough I did half one way and half the other, but like last week I do have some dough in the fridge (good news if I can't decide what to give someone for the holidays!)


Due to a very busy job, end of year work celebration and a birthday (yay!) I only finished the slice-and-bake variety. And I didn't frost them (see "I am busy" statement above). I baked them on Sunday, and by tonight they are a little crunchy, but still good. This would be a great recipe to have on hand if you were the type of person who had unexpected company since the dough can stay in the freezer for up to two months.

The important lesson I learned this week (or relearned, as the case may be) is that I need to work on my math skills. I thought last week's cookies were too thick. This week I finally wised up and got out the ruler. As it turns out, there was a really good reason I thought my cookies were too thick -- they were! By about 1/4 of an inch! Oh bother! I adjusted my slicing skills this week and the sugar cookies turned out great. I'll get the hang of measuring things eventually (I hope!).

Many of the TWDers already have sugar cookie recipes that they are very fond of, but I'm not committed to any one recipe. I'd definately give this one another try, and I'm looking forward to rolling out the shapes and see how those cookies turn out. And I think frosting is fun, too.

Thursday, December 4, 2008

TWD: Linzer Sables


This week "TWD" stands for "Thursdays with Dorie" - I was a little off on my calculation below. Oh well -- I'll get back on track by next week (hey, maybe I should start baking those cookies now!)

This week's recipe comes from Dennis at Living the Life. Linzer Sables are versatile little cookies that can be made as a single cookie, or as a sandwich. The filling can be either jam or chocolate. I like both fillings, and I really like the "peek-a-boo" nature of the sandwich option, so I decided to make the sandwiches with both fillings.

Cookies are something I have some experience with, certainly much more experience than just about anything else I've blogged about so far. It was the first thing we learned in my beginning baking class. One of the keys, I learned, is in the blending of the sugar and butter. Up to that point I had not blended long enough. But once I learned to let the KitchenAid go for 5 minutes or so, my cookies have turned out much better. Plus I love the pattern it makes in the bowl.


The trait I have yet to master, however, is not getting impatient in all other things. I often stop a process early for fear of going to far, when in fact the end result doesn't turn out as well because I didn't let the process go on long enough. This may be the case with my dough, which seemed a little grainy and didn't seem to come together enough.


I rolled out enough to make 9 sandwiches, and probably have enough to make 2-3 more in the freezer from the scraps of the first round. I sure wish I had a cute little cutter like the one in Dorie's book, but used my regular round cutters instead. I picked the smallest one for the center cut, but it may be too big. Almost all of those cookies broke when making the center cut. Drat!


The cookies were in the oven a wee bit too long (so much for my impatience when I get distracted), but the powdered sugar hides that fairly well. I really like the crunchy texture and the nutty flavor from the almonds (the recipe let you choose the type of nut to use - the other choices were either hazelnuts or walnuts). I thought I would like the chocolate sandwich better, but I actually like the jam option best (I used strawberry preserves as that is what I had on hand). Something about the sweet fruit contrasting with the nutty cookie just spoke to me.

These cookies sure look cute, and are very tasty. I would definately try them again, but would roll them out thiner. Several TWDer thought 1/4 inch was too thick for the sandwich version, and I agree. For a single cookie that's okay, but for a sandwich -- too much.

Oh, and next time I would try not to get either impatient or distracted! (ha!)

Tuesday, December 2, 2008

Announcements

First off, I humbly say that this week I will be participating in "Wednesdays with Dorie." I know -- I know! -- it's not Wednesdays with Dorie, but for me, this week, it is the best I can do. Blame it on the holiday weekend. Blame it on school last night. Blame it on a 12 hour work day today. i will endeavor to do my best to get back on track next week, but for this week, you'll see Linzer Sables on Wednesday.


That said -- I have very exciting news. News I have waited TWO years to get. Many a week I have hoped, many a week my hopes were dashed - until last week.


Yes, it's true.......


The Argentinian shrimp are back at Trader Joe's!


It all started for me several years ago when I worked at my local TJ's. I was introduced to this shrimp by the "more experienced" crew members. They lured me in with this shrimp wrapped in bacon ("oh, just take one" they said), and other nefarious ways of preparing it. I was hooked. Then, without warning, the shrimp were gone. Something about over fishing or no supply. I was crushed. Then two years later, after I was no longer employed but still shopped there, they were back. I was overjoyed, but low on cash. "I'll only get one" I said, "and I will get another bag the next time I'm here." Oh yes, you guessed it, when I returned, the shrimp had once again disappeared.


Every week I would stroll by the place they once resided, and every week I would be disappointed. They were gone for another two years (TWO YEARS!) until last week. Having learned from my mistakes, and having earned two years of rasises while waiting, I did not hesitate when I saw them and I bought two bags. I sleep a little sounder knowing they are in my freezer. Just waiting for me.


If your local Trader Joe's sells these little delights RUN to the freezer section and buy a bag for $8.99. I don't know if all TJ's sell them, I can only speak for the San Diego County stores. If you find them though, you won't be disappointed.


Sunday, November 30, 2008

Mac and Two Cheeses with Caramelized Shallots


I'm new to Bon Appetit magazine. I saw one of those deals that I couldn't resist, so I'm giving it a whirl. What lured me in, besides the ridiculously low price, was the fact that two of my favorite food writers are regular contributors - Dorie Greenspan (a la Tuesdays with Dorie) and Molly Wizenberg (who's blog is one of the most sublime reads ever. How does she put all those words together so beautifully? And when she wrote about her wedding last year.....well.....I needed a hanky.)

I mentioned this recipe in another post, but thought I'd give it a solo entry. It was the first recipe out of the magazine I tried. I'm incredibly busy at my job, so comfort food was really attractive. To say the results were yummy would be an understatement. It was beyond yummy. And frankly, with the ingredients listed, how could it be anything but yummy. I must caution you, however, that if you truly want to enjoy it, DO NOT read the nutritional information at the bottom of the online recipe. Seriously! Just make it, enjoy it, savor it. Perhaps small helpings so as not to overload your arteries all at once. Oh and perhaps run a marathon after you're done. Then you'd be a-okay.

With that warning, here's all you need for serious comfort and yum!

Tuesday, November 18, 2008

TWD: What's Black and White.....


....and runny all over? Well, that was the buzz on the TWD blog with this week's recipe Arborio Rice Pudding, White, Black (or both). I really love rice pudding. It's among my favorite "comfort" type desserts. And I had the rice on hand, since I like making risotto, so I was looking forward to giving this a try, especially after last week's cake.

Luckily I do these recipes after many others have posted about how it worked for them, so I can learn from their experiences. And this week Dorie herself posted that the recipe had a fatal flaw in that the time for it to simmer on the stove was off by 20 minutes (explaining why so many people had rice soup).


Knowing that in advance I settled in for a long night of simmering, and "entertained" myself by simultaneously making the Mac and Cheese recipe in this month's Bon Appetite Magazine (FYI - way yummy!). I didn't time how long the rice simmered, but the milk looked 80-90% absorbed to me, so I took it off the stove and divided it in two to do both the vanilla and the chocolate versions.

For some time now, I've known I'm not so good with the math (many moons ago, when I worked banquets, the powers that be finally stopped sending me out to determine how many people were at my 4 tables of 10 because I could never come back with the correct answer. I know! Sad! But somehow I can balance my checkbook to the penny. But I digress). My point is, I apparently don't know what 80-90% milk absorption looks like, as this morning I find I have rice soup. At least it is tasty rice soup, and I have plenty of company as many other TWDers got the same result.


This is a recipe I might try again at some point, but probably not anytime in the near future. The servings were VERY small, and it seemed like a lot of time for little return. If I were to make it again I would probably add a bit more rice (this time I increased the amount stated by a small amount, and decreased the milk 1/4 cup, hoping to avoid the soup result). I've only tried the chocolate, and although tasty, there was something about the consistency I didn't like. Perhaps I needed to chop my chocolate into smaller pieces. Perhaps the rice wasn't hot enough by the time the chocolate got mixed in to adequately melt all of it. Perhaps I need to go to chocolate school?

I was hoping to bring in a serving or two for my boss' boss, who had a birthday a week ago and I missed it. Alas, I don't think this will be the "presentation" I was hoping for, so he will have to wait for another week.

Tuesday, November 11, 2008

TWD: Kugelhopf


I know -- easy for you to say!

I just officially joined Tuesdays with Dorie, and this is my first official attempt at the weekly recipe. I have to say that when I read it over, and realized how much time this was going to take, that I reconsidered my membership! It is a daunting first recipe due to the time it takes to make it.

Kugelhopf is a bread-like cake from the Alsace. The recipe includes a lot of rising and "slapping down" of the dough, plus a overnight in the refridgerator (which due to my busy scheduled turned into two nights). Many of my fellow TWDers had some of the same problems I had.

My first sign of trouble was when the dough did not rise up onto the doughook of my mixer. Happily (well, in a "misery loves company" sort of way) others had the same problem. I was also not alone with the cake not rising completely on the second round.


The result -- not bad. I followed the recipe pretty much exactly -- used golden raisins left over from the pumpkin muffins, and tossed in a few chocolate chips just for good measure. And the sugar on top is Turbinado from Trader Joes. Otherwise, no variations.
Worth the time - probably not. However, I'm rather looking forward to it for breakfast!
(ed to add photos)

Sunday, November 9, 2008

Pumpkin Ravioli with Gorgonzola Sauce


Trying this recipe came about for three reasons. One -- I've been collecting recipes out of magazines for a very longtime, but they have just sat in big piles, unorganized and untested. It was making me crazy so I finally sorted through them. I tossed duplicates (a girl can only have so many recipes for potato salad or lasagna) and organized by type. Two - while sorting through the piles, I found this recipe, and knew I had some left over canned pumpkin for trying a TWD recipe (Pumpkin Muffins - didn't much like them. I think I over cooked them . Sadness...) And Three -- I have a mini-herb garden off the back step, and I'm always looking to use up the sage that is growing so happily out there. Three birds, one stone!


This recipe isn't particularly difficult, though it does take a little bit of time to put together the ravioli. I'm still working on my time management skills in the kitchen, so the end felt a little rushed. The recipe said to add more to each won ton wrapper than I thought would work, but even though I didn't use as much per round, I ended up not having as many ravioli at the end as planned. The recipe says it makes 30, and I probably got 25 ravioli when I was done.


And the result -- well it was okay. I didn't love it, but I didn't hate it either (how's that for an endorsement!). I liked the creaminess of the pumpkin and how it played with the creaminess of the sauce. I also liked the bite the sage gave the filling, and how it played with the bite from the Gorgonzola. It seemed okay overall, and I was content to put away the extras for lunches later.


The next day I took one said lunch serving out, heated it up for two minutes, and really liked it much better than the night before. Maybe it's one of those things that needs to sit to really make the flavors sing. I'm still not sure I will be making this again, but I do know I'm happy to have two more servings waiting for me in the fridge!

I substituted pecans for hazelnuts (I had a few pecans that needed to be used), otherwise, I followed the recipe as below.

Pumpkin Ravioli with Gorgonzola Sauce
Cooking Light Magazine, Nov. 2007

1 1/4 cups canned pumpkin

2 Tablespoons dry breadcrumbs

2 Tablespoons fresh grated Parmesan cheese

1/2 teaspoon salt

1/2 teaspoon minced fresh sage

1/4 teaspoon freshly ground black pepper

1/8 teaspoon ground nutmeg

30 round wonton wrappers

1 Tablespoon cornstarch

Cooking spray

1 cup fat-free milk

1 Tablespoon all-purpose flour

1 1/2 Tablespoons butter

1/2 cup (2 ounces) crumbled Gorgonzola cheese

3 tablespoons chopped hazelnuts, toasted


1. Spoon pumpkin onto several layers of heavy-duty paper towels, and spread to 1/2-inch thickness. Cover with additional paper towels; let stand 5 minutes. Scrape into a medium bowl using a rubber spatula. Stir in breadcrumbs, Parmesan, salt, minced sage, pepper, and nutmeg.

2. Working with 1 wonton wrapper at a time (cover remaining wrappers with a damp towel to keep from drying), spoon 2 teaspoons pumpkin mixture into the center of wrapper. Brush edges of wrapper with water and fold in half, pressing edges firmly with fingers to form a half-moon. Place on a large baking sheet sprinkled with cornstarch. Repeat procedure with remaining wonton wrappers and pumpkin mixture.

3. Fill a large Dutch oven with water; bring to a simmer. Add half of ravioli to pan (cover remaining ravioli with a damp towel to keep from drying). Cook 4 minutes or until done (do not boil), stirring gently. remove ravioli with a slotted spoon; lightly coat with cooking spray, and keep warm. Repeat procedure with remaining ravioli.

4. Combine milk and flour in a saucepan, stirring with a whisk. Bring to a boil, cook for 1 minute or until thick, stirring constantly. Remove from heat. Add butter, stirring until butter melts. Gently stir in Gorgonzola.

5. Place 5 ravioli in each of 6 shallow bowls, and drizzle each serving with 3 Tablespoons Gorgonzola mixture. Sprinkle each serving with 1 1/2 teaspoons hazelnuts. Serve immediately. Yield: 6 servings

Thursday, October 16, 2008

Caramel-Peanut Topped Brownie Cake

Now that I've dropped a class, I'm thinking about hopping on the baking bandwagon. The weather is turning cooler, so baking is more reasonable now than in the summer when it is so hot (and I have no air conditioner). I also wanted to see if I could commit to what it takes to participate with the gals over at Tuesdays with Dorie. I bought the book, and gosh, there are so many delicious and beautiful things to bake. I made this too late to post on the required day, but gave the Oct. 7th recipe a try, and will try to pick up with next week's item (the Pumpkin Muffins, just in time for a fund raising bake sale at work!).

If I had not taken a Baking and Pastry class previously, this recipe would have been very challenging. Dorie Greenspan does a really super job with directions, so I could have worked through it, but the extra experience sure helped (I'm not very confident trying new things in the kitchen. I need the remedial class most of the time!). The trickiest part is the carmel for the topping. That stuff is like molten lava, and the last thing you want is to have some sort of an accident. Yikes! But truth be told, I'd rather cook with that than chocolate. That stuff gets everywhere!

Since one of the rules is to not post the recipes for TWD, I'll just include some steps and pictures below.

The batter was pretty quick and easy. You can see the bowl from melting chocolate and butter over a pan of water behind the bowl with the batter. Like I said, that stuff gets everywhere!

One thing I do like about baking, is while the cake is in the oven, and/or while it cools you can do the dishes. It's nice to have a tidy kitchen.

After letting the cake cool, and preferable right before you serve it, you make the topping. That's when the science experiment begins. Many of the folks who tried this said this stage took longer than the recipe advised, and I had the same experience. Besides being the temperature of the sun, carmel is one of those things you need to keep an eye on. It takes forever to turn a carmel color, but once it turns it doesn't take long for it to pass the point of no return (and burnt tasting carmel). Happily mine did not.


Once off the heat peanuts are added, and then the cake, back in its freshly cleaned springform pan, is topped. I don't have any pictures of the cake once "released" from the pan, as that happened at work, and my co-workers took care of this cake in record time.

It's very good, though very sweet and very rich. A little goes a long way. I would definitely make it again -- especially as a celebration cake, or to impress someone.

Latin America - Chiles Rellenos

First let me say this -- sheesh, this hasn't gone well so far!


The school thing combined with the work thing is grueling. Too much to do with a full time job. Something had to give, so it was with great sorrow that I gave up my International Cooking class. I really liked it and felt I learned a lot, but it was scheduled on Friday and it kicked my butt. I worked from home for 1 1/2 hours, went to school for 5 hours, then drove to the office and worked another 5-6 hours. A very long day to say the least!

When I was going to that class, I kept forgetting my camera. Plus, although I'm very capable of cooking things at home, for some reason I had a bad mojo in that class, and things didn't turn out so well (therefore, I was pretty happy not to have the camera!).

That all said, I tried some interesting food that I really enjoyed, and I plan on making some of it on my own. First up, from our Latin America class - Chiles Rellenos. They have a special spot in my heart as my dad would make them when I was a kid. They aren't very complicated, but they are a little labor intensive.

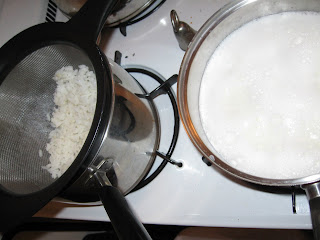
The first step is to roast the chiles.

In class we put them over the gas flame on the stove. At home (above) I chose to put them in the oven. I liked that better. It made the chiles easier to peal and and the seeds and veins easier to remove. It seemed like there was less "chile" there, however. If I were to do it again, I would put them in the oven, but with something on the pan. They popped and spattered all over my baking sheet -- but the house sure smelled good.

After roasting them, they need to sweat for a bit, and I took that time to prepare the rest of the ingredients.


In class we used gloves to remove the skin, seeds and veins of the chile, and stuff them with cheese. At home I had no problem with the oils from the chiles. I did have trouble getting the little buggers stuffed and back into their original shape. Again, it was easier at home than in class -- not sure if that's due to how the chiles were roasted, or the old "practice makes perfect" idea.

After reconstructing the chiles it was time to whip up the batter.


This worked out much better at home. It looked so pretty I didn't want to dip the chiles in it! But everybody ended up in the pool and in the frying pan. Try to keep track of where the slit is on each pepper and make sure that it is facing up when you put the chiles in the pan. Otherwise your cheese might melt and ooze out, which is neither pretty or tasty (well, fried cheese is tasty, but for this you'd rather have it in the chile -- or would you?)


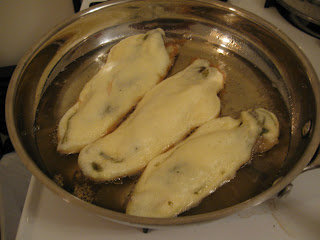
After a quick fry and a quick turn, out they come to drain on a paper towel. You can eat them with salsa, but I enjoyed them just on their own.


Overall I was pleased with the results. They still had some chile heat, but not too much (I don't do well with spicy food). They probably could use a little bit more of a drain (perhaps a second set of paper towels to pick up some of the grease), but otherwise, they were very yummy. And happily I found all of the toothpicks! (be sure to count them as you put them in so you know how many you need to take out!).

Chiles Rellenos with Fresh Green Chiles
Adapted from: That's My Home 2000 - 2006

12 medium Anaheim or Poblano chiles (about 2 pounds), roasted and peeled (see notes) (I used Anaheim chiles which are easy to find in your grocery store produce section)

1 1/4 lbs. grated Monterey Jack cheese (5 cups)

3 eggs, separated

1/8 tsp salt

vegetable oil, for frying

2/3 cup all-purpose flour

2 cups prepared salsa

Slit each Chile open lengthwise along 1 side and gently remove seeds and vein. Spread about 1/4 cup cheese in center of each pepper and press closed. Secure with toothpicks if necessary (remember to count them!). Set aside.

Beat egg whites in large non-aluminum bowl until stiff. Beat in salt, then egg yolks, 1 at a time.

Pour 1/2 inch of oil into heavy skillet and heat until almost smoking.

Sprinkle flour on both sides of as many chiles as will fit into your skillet in a single, uncrowded layer, then dip each pepper in egg mixture (you definitely don't want to dip them all at once). Place in oil and fry until golden on bottom, turn, and fry until golden on other side, about 1 minute. Remove chiles to paper towels to drain. Continue until all peppers are fried. Keep in a warm oven until all chiles are fried.

Arrange chiles on platter or individual plates and top with salsa. Serve right away.

Note: Wear gloves when handling fresh chiles; the oils can cause a burning sensation on your skin.

Note: To roast chiles, place in a preheated 450 degree oven on cookie sheet, turning after 10 minutes, and continue roasting until skins blister and blacken in spots. Or, place on broiler pan and broil about 5-6 inches from the heat source, turning often, until skin is charred on all sides. Or, hold over gas burner, turning until all sides are charred. Place in a bag or covered bowl for about 10 minutes. Skin should peel right off.


Saturday, August 30, 2008

What am I getting myself into!?!

This week, I made a sudden and rash decision to return to culinary classes after a year and a half absence. What started as one "well, might as well" class has become two "omg, will I be able to keep up" classes (as there is a full time job and a tour guiding gig to juggle in there as well). Decided to raise the "steaks" (ha - food joke!) and add a blog to the mix.

So it is here that I will be writing about what I learn, how the things we make in class turn out, how the at-home practice dishes work out, and if I'll still be alive at the end of 16 weeks.

Wish me well!